Quick Overview: Cookie Monster Cake Blueprint
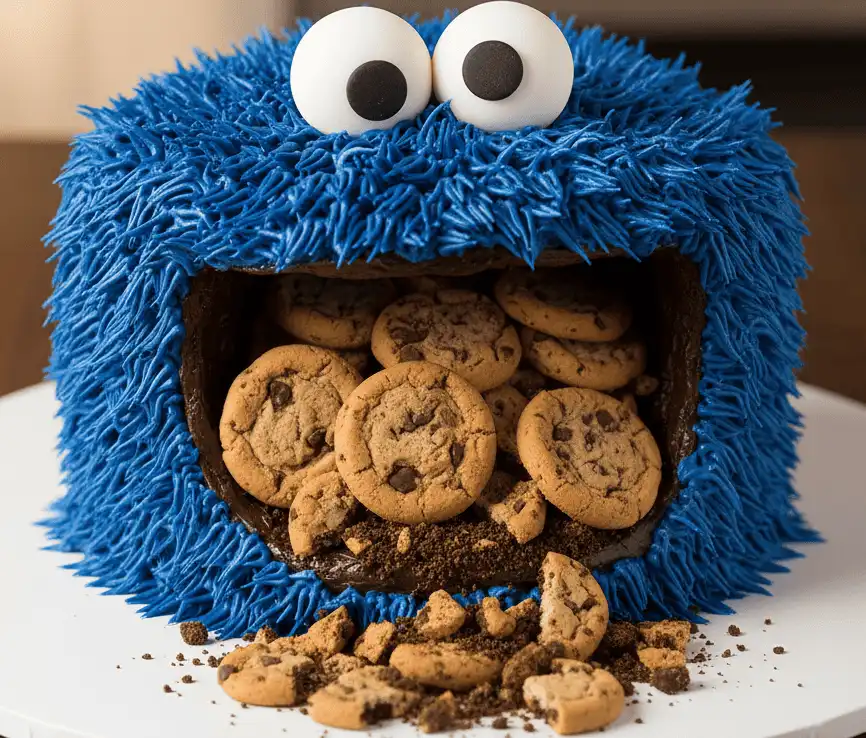
A showstopping Cookie Monster cake requires four core elements: a dense, carveable sponge layer, deep blue buttercream, realistic googly eyes, and an open mouth packed with chocolate chip cookies. Using a multi-opening grass piping tip gives the character his signature fuzzy shag appearance without tedious individual piping.
Carving an angled wedge into the top third of the assembled cake creates the mouth cavity. Coating that recessed opening in dark chocolate ganache or black cocoa frosting provides realistic visual depth before wedging cookies in place.
- Primary Piping Tip: Wilton #233 (standard) or Ateco #133 (extra-wide grass tip).
- Color Formula: Royal Blue gel food color with a micro-drop of violet to counter yellow butter undertones.
- Pupil Secret: Off-center, unaligned black pupils create Cookie Monster’s signature manic gaze.
Introduction
Cookie Monster remains one of the most recognizable and beloved figures in children’s television history. Transforming this iconic Sesame Street character into a centerpiece cake brings unmatched joy to birthday parties, baby showers, and milestone smash cake sessions.
While the design looks intricate, the cake relies on straightforward baking mechanics and repeatable piping motions. A home baker with basic tools can create a bakery-grade presentation by following fundamental structural rules.
This guide breaks down every stage of construction, from crumb density and color balancing to three-dimensional carving and heat management. You will gain the exact techniques required to avoid drooping eyes, runny frosting, and structural collapses.
Choosing the Right Cake Base and Crumb Density
Sculpted character cakes place unique physical demands on cake sponges. A cake that must support heavy buttercream fur and a carved mouth wedge requires structural integrity.
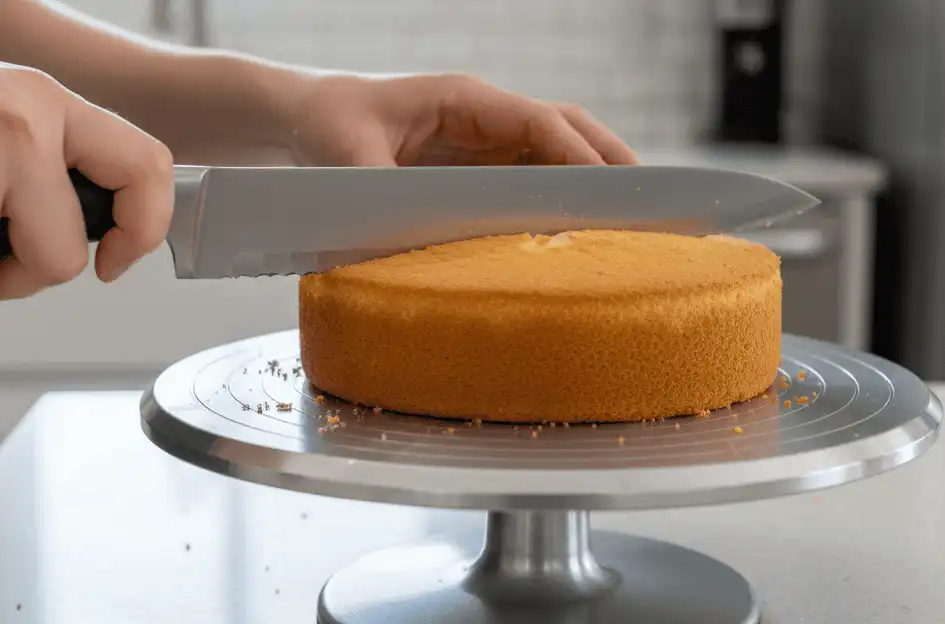
Light, airy sponges like angel food or delicate chiffon will crush under the weight of several pounds of dense frosting. Opt instead for sturdy oil- or butter-based sponges that firm up when chilled.
Recommended Cake Flavors and Formulas
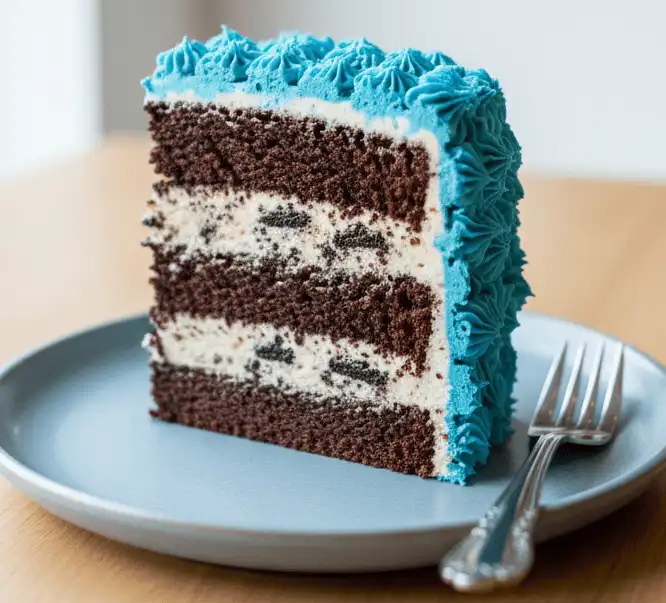
Classic vanilla butter cake, rich chocolate fudge cake, and cookies-and-cream cake are the top choices for this theme. A cookies-and-cream sponge—folded with crushed chocolate sandwich cookies—reinforces the cookie narrative with every cut slice.
If you prefer using boxed cake mixes, modify them for structural stability. Replace water with whole milk, add an extra egg yolk, and mix in a box of instant pudding mix to tighten the crumb structure.
Chilling Sponges Before Sculpting
Never attempt to carve or frost a warm or room-temperature cake layer. Freshly baked cakes produce excess loose crumbs that tear under an offset spatula and clog fine piping nozzles.
Bake your cake rounds at least 24 hours in advance. Wrap each cooled layer in two layers of plastic wrap and refrigerate for at least four hours, or freeze for up to one month before carving.
Buttercream Science: Texture, Stability, and Color Chemistry
The frosting is the defining medium of any Cookie Monster cake. It must hold rigid peaks when extruded through a grass tip while remaining soft enough to pipe continuously without straining your hand.
Selecting the Frosting Base
American Buttercream (ABC) provides the highest crusting power and physical structure. Its powdered sugar framework prevents piped hair strands from sagging or melding into a smooth blob.
Swiss Meringue Buttercream (SMBC) produces a silkier mouthfeel and less cloying sweetness, but requires a cooler working environment. If using SMBC, chill your piping bags regularly to keep the butter from softening past the point of structural stability.
The Color Formulation: True “Sesame Street” Blue
Achieving the authentic, electric cobalt blue of Cookie Monster can prove challenging in butter-based frostings. Natural dairy butter has a yellow cast that shifts blue pigments toward an unappealing teal or murky green.
Neutralize yellow undertones by adding a minuscule trace of violet gel paste on the tip of a toothpick before adding your blue. Once neutralized, blend Royal Blue and Sky Blue concentrated gel colors until you reach a saturated medium-dark shade.
Professional Color Advice: Gel food coloring darkens significantly as it rests and oxidizes. Mix your blue frosting 12 to 24 hours ahead of time, cover it tightly, and allow the color molecules to fully hydrate and deepen overnight.
Sculpting the Face and Carving the Mouth Cavity
Cookie Monster’s mouth is his defining personality feature. Without an indented mouth, the cake appears flat and loses its expressive three-dimensional realism.
Calculating the Cut Angle
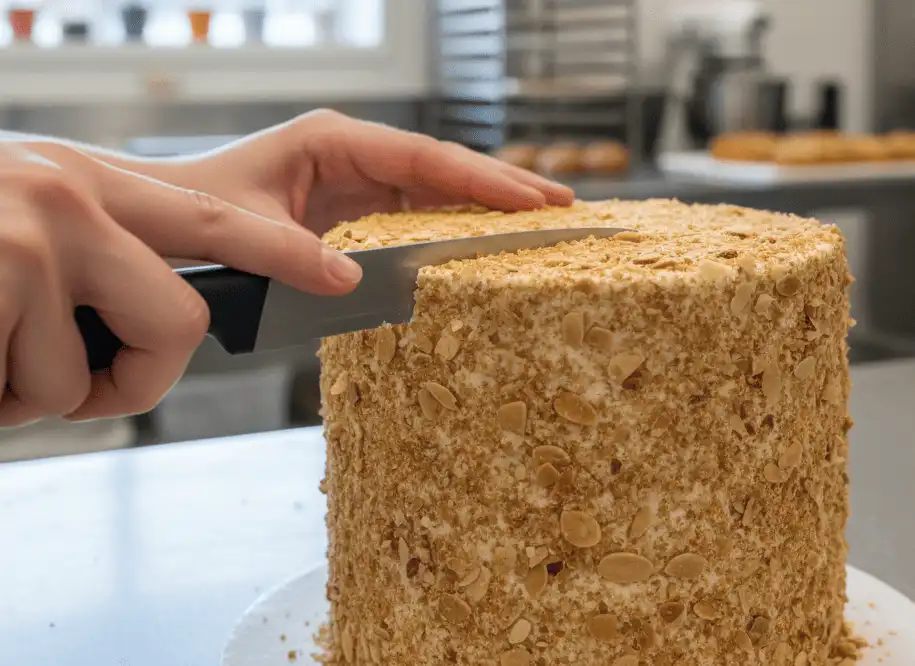
Stack your chilled, leveled cake rounds with your chosen filling. The ideal canvas is a tall cylinder measuring 6 to 8 inches in diameter and at least 5 to 6 inches tall.
Using a sharp serrated utility knife, cut a horizontal wedge into the front face of the cake between the middle layers. Angle the cut downward at approximately 30 to 45 degrees, penetrating 1.5 to 2 inches into the center of the cake.
Creating Visual Depth
Remove the carved cake wedge carefully using an offset spatula. Do not discard this scrap cake; you can crumble it to test your frosting colors or make cake pops.
Coat the entire interior of the newly formed cavity with black cocoa buttercream or dark chocolate ganache. This dark backing absorbs ambient light and creates the illusion of an endless, deep mouth ready to swallow cookies whole.
Fur Piping Masterclass: Multi-Opening Tips and Techniques
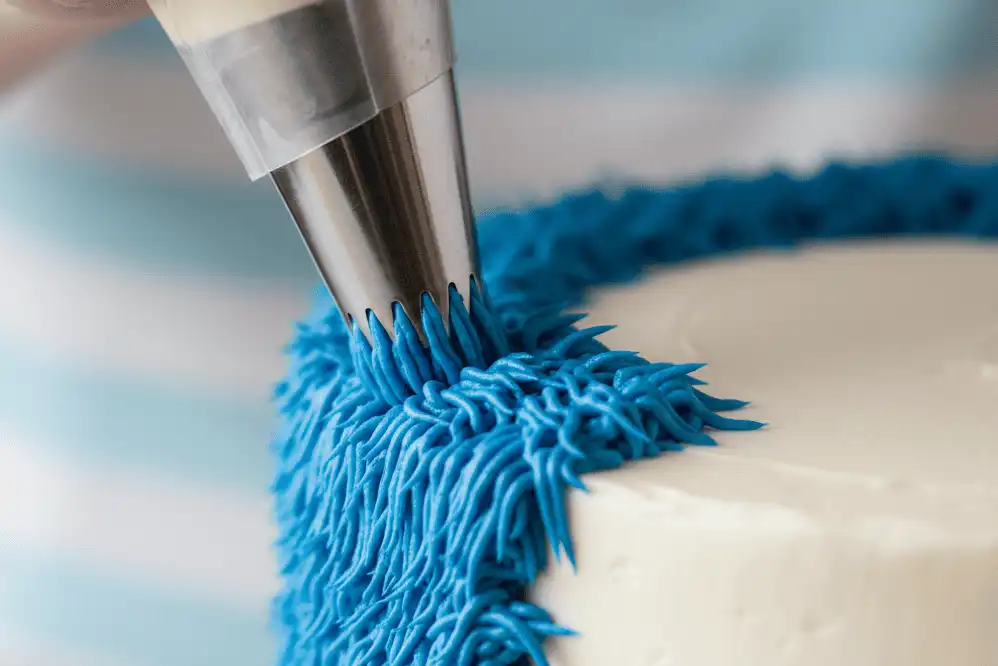
Piping realistic monster fur is simpler than it looks, provided you understand the physics of pressure control and piping angles. The multi-opening grass tip does all the heavy lifting.
The Grass Tip Mechanics (Wilton #233 vs. #234)
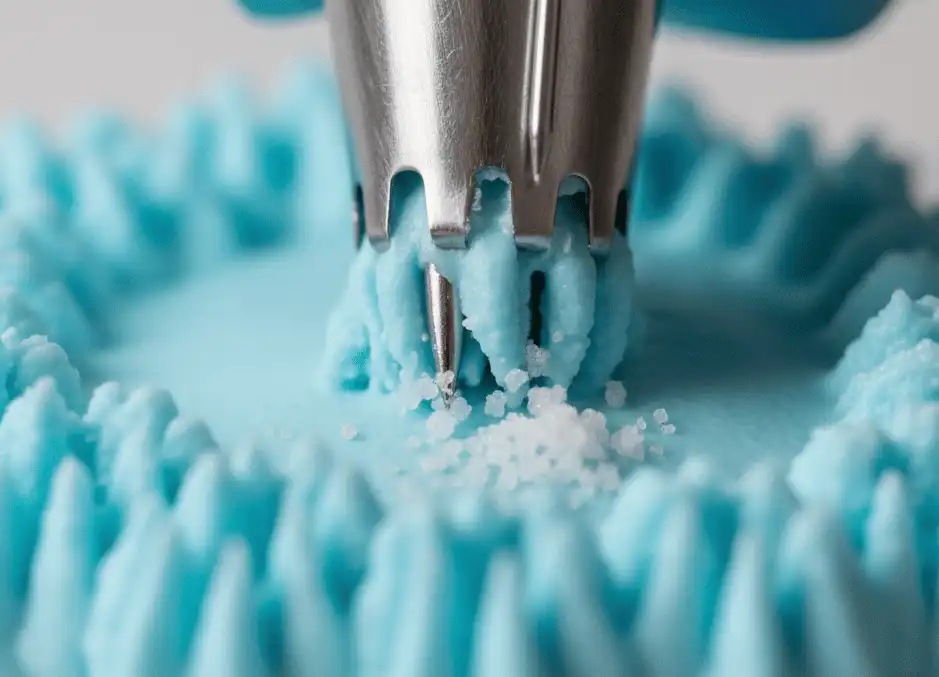
A standard grass tip (#233) features an array of tiny perforations that extrude small clusters of frosting simultaneously. An extra-large grass tip (#234) extrudes thicker, bolder strands and covers the cake surface three times faster.
Hold the piping bag at a direct 90-degree perpendicular angle to the cake surface. Keep the metal tip roughly 1/8-inch away from the cake before initiating pressure.
The Pull-and-Release Rhythm
Squeeze the piping bag firmly to establish a solid anchor base against the crumb coat. Once the frosting bonds to the cake, pull the tip directly outward by half an inch, then release squeezing pressure before pulling away.
If you pull your hand away while still squeezing, the fur strands stretch thin, snap, and droop downward. Work from the base of the cake upward in overlapping horizontal rows, allowing the top fur layers to drape naturally over the lower tiers.
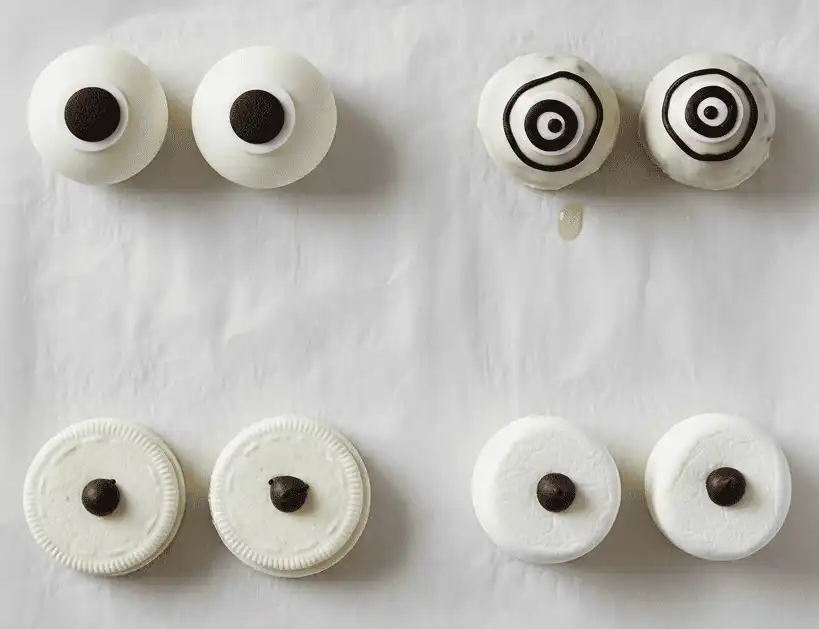
Crafting Authentic Edible Eyes: 4 Reliable Methods
Cookie Monster’s eyes are round, white, and notably asymmetrical. His wandering, unaligned pupils are essential to capturing his goofy, food-obsessed expression.
Method 1: Solid Fondant Spheres (Most Durable)
Roll white vanilla fondant into two smooth balls roughly 1.5 to 1.75 inches in diameter. Roll two tiny pieces of black fondant into flat discs for the pupils.
Moisten the back of the black discs with a damp brush and press them onto the white spheres. Ensure the pupils face slightly different directions—one looking up and inward, the other looking outward.
Method 2: White Chocolate Truffles or Cake Pops
Store-bought round white chocolate truffles provide an instant spherical shape with zero shaping effort. Secure each truffle to a toothpick, then paint a pupil using black gel color mixed with a drop of clear grain alcohol or extract.
Alternatively, roll leftover cake scraps with frosting into tight spheres, dip them in melted bright-white candy melts, and allow them to set on parchment paper.
Method 3: Sandwich Cookies and Wafer Melts
For a quick, flat-style eye design, separate white cream sandwich cookies or use flat white candy melting wafers. Pipe a dollop of black frosting or attach a mini dark chocolate chip in the center for an effortless solution.
Method 4: Large Marshmallows (Best for Beginners)
Large standard marshmallows can be trimmed slightly at the back to create a flat anchoring surface. Insert a regular dark chocolate chip point-first into the front side to instantly create high-contrast pupils.
Step-by-Step Assembly and Decorating Tutorial
Phase 1: Foundation and Crumb Coating
Secure the bottom cake layer to a greaseproof cake board with a smear of buttercream. Spread an even layer of filling, add your remaining layers, and align them using a bubble level or straight edge.
Carve your mouth cavity as outlined in the sculpting section. Cover the entire outer surface of the cake in a thin crumb coat of blue buttercream, sealing in all loose cake fragments, and chill for 30 minutes until firm.
Phase 2: Lining the Mouth and Securing the Eyes
Paint the carved interior cavity with smooth black buttercream using a small curved offset spatula. Ensure the boundary between the black mouth and blue crumb coat remains sharp and clean.
Insert wooden skewers or sturdy cocktail picks halfway into your prepared edible eye spheres. Press the exposed ends of the skewers firmly into the top front edge of the cake, positioning the eyes directly above the mouth opening.
Phase 3: The Fur Piping Process
Fit a 16-inch piping bag with a coupler and your grass piping tip, filling the bag only halfway to prevent your body heat from softening the frosting. Begin piping at the very bottom base of the cake against the cake board.
Work your way up the cylinder in continuous, overlapping rings of short, textured fur. When you reach the eye sockets, pipe fur tightly around the base of the white spheres to conceal the skewers and create an integrated, natural brow line.
Phase 4: Cookie Placement and Staging
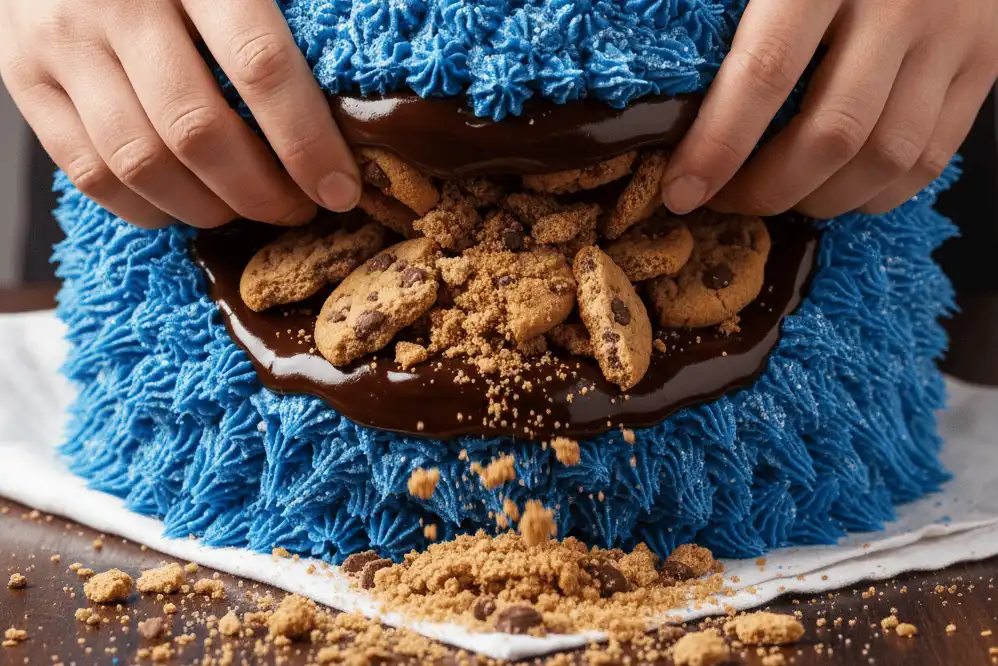
Select crisp, golden-brown chocolate chip cookies in various sizes. Break one cookie in half and push the broken edge deep into the black mouth cavity, bedding it into the black frosting.
Wedge a full-sized cookie beneath it, angling it outward as though it is halfway through being chewed. Scatter crushed cookie crumbs across the lower mouth opening and down onto the cake board to mimic real crumbs.
Cake Formats: Smash Cakes vs. Multi-Tiered Centerpieces
A Cookie Monster design can scale from an intimate first-birthday smash cake to an elaborate multi-tiered celebration centerpiece.
The First Birthday Smash Cake
Smash cakes typically measure 4 to 6 inches in diameter and prioritize baby safety above all else. Avoid sharp wooden dowels, toothpicks, or raw skewers to anchor the eyes on a cake intended for a toddler to smash.
Use large marshmallows, soft meringue drops, or piped white buttercream mounds for the eyes instead of hard fondant or skewers. Keep the frosting recipe lower in food dye or use natural spirulina-based blues to minimize skin staining during the photo session.
Multi-Tiered Sesame Street Party Cakes
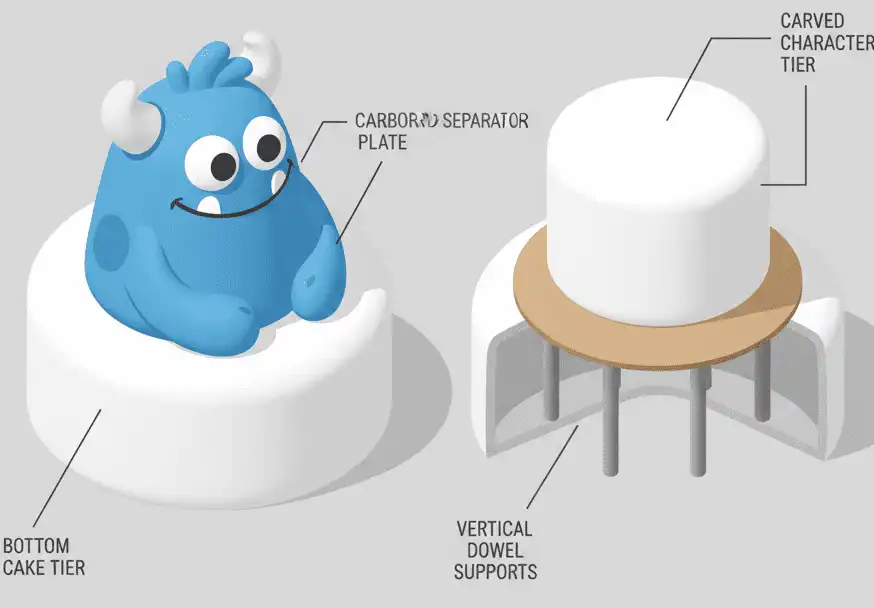
For larger gatherings, place the carved Cookie Monster tier on top of a 10-inch base tier decorated with yellow feathers for Big Bird or red fur for Elmo. Each tier must sit on its own dedicated cardboard round supported by internal plastic or wooden dowels.
Never place a heavy, carved tier directly on top of a lower cake without an internal support structure. The weight of the upper tier will crush the lower cake’s crumb structure and cause the entire display to tilt.
Comparison: Piping Tips, Fur Textures, and Speed
Different piping tips create distinct aesthetic styles and demand varying levels of time and wrist stamina. Review the specifications below to select the right tool for your timeline.
| Piping Tip | Visual Texture | Time Required | Hand Strain | Ideal Frosting Base |
|---|---|---|---|---|
| Wilton #233 (Small Grass) | Fine, hyper-realistic fur strands | High (35–45 min) | High | Crusting American Buttercream |
| Ateco #133 (Large Grass) | Thick, chunky puppet shag | Medium (15–20 min) | Moderate | Medium-Stiff American or SMBC |
| Wilton #21 (Open Star) | Textured drop rosettes / stars | Low (10–12 min) | Low | Swiss Meringue or Whipped Ganache |
| Wilton #1M (Large Star) | Stylized modern swirl rosettes | Very Low (5–8 min) | Minimal | Any medium-consistency frosting |
Comparison: Buttercream Formulas for Character Piping
Each frosting category balances pipeability, flavor, and thermal resistance differently. Choose your formulation based on your event venue and climate conditions.
| Frosting Style | Fur Definition | Heat Tolerance | Sweetness Level | Color Absorption |
|---|---|---|---|---|
| American Buttercream | Sharp, crisp, rigid strands | Moderate to High (crusts) | Very High | Fast and highly saturated |
| Swiss Meringue | Soft, silky, natural droop | Low (melts at 80°F / 27°C) | Moderate / Balanced | Requires extra gel and blending |
| Ermine (Cooked Flour) | Medium-sharp definition | Moderate | Mild / Nostalgic | Moderate |
Expert Tips for High Heat, Stability, and Clean Cuts
Professional decorators use specific workflows to maintain sharp details and minimize stress during high-volume production. Incorporate these habits to elevate your final presentation.
The Two-Bag Rotation Strategy
Your hands naturally emit warmth, which transfers directly through piping bags into your blue buttercream. Within ten minutes, warm frosting will emerge as soft, melted strings that lack definition.
Fill two smaller piping bags fitted with couplers rather than one giant bag. Keep one bag resting in the refrigerator while working with the other, swapping them every ten minutes to guarantee crisp fur strands.
Tackling Blue Mouth Staining
Deep blue food coloring can temporarily tint teeth, lips, and toddler hands. While completely non-toxic, excessive dye can surprise parents and party guests.
Use a concentrated, high-pigment professional gel rather than liquid grocery store dyes. The higher pigment load means you need fewer total drops, significantly reducing flavor bitterness and surface staining.
Cutting Clean Slices
A cake loaded with textured frosting and whole cookies can tear into messy clumps if sliced with a cold, dull knife. Always use a large, thin-bladed chef’s knife heated under hot running water and dried completely.
Wipe the knife blade completely clean with paper towels between every cut. Slice downward firmly in a single decisive motion rather than sawing back and forth through the sponge layers.
Common Mistakes and Immediate Solutions
1. Grass Tip Holes Keep Clogging
Tiny clumps of unmixed powdered sugar or butter lumps can block the micro-holes of a grass tip instantly. This causes pressure to build until frosting erupts from the top of the piping bag.
Always sift powdered sugar through a fine-mesh sieve before mixing your buttercream. If a clog occurs, clear the holes with a sterile needle or toothpick rather than squeezing harder.
2. Edible Eyes Sliding Down the Face
Heavy fondant eyes placed directly onto soft buttercream will slowly migrate downward as gravity takes over. The weight drags the fur and leaves unsightly tears across the front facade.
Always support sculpted eyes with structural wooden skewers anchored deep into the cake’s internal crumb. Chill the cake for 20 minutes immediately after placing the eyes to lock the anchor points in place.
3. Murky Green or Teal Fur Color
Adding blue dye straight into a yellow butter base produces green rather than royal blue. This color shift ruins the character likeness immediately.
Use extra-light butter or whiten your base frosting first using a drop of white food coloring or a microscopic dot of purple dye. Once the base is neutral, your blue gels will show their true, vibrant hue.
4. The Mouth Cavity Sinks or Collapses
Carving too deeply into the cake compromises the structural core, causing the upper layers to bow forward and flatten the mouth. The cake may begin to fold in on itself during transport.
Never carve deeper than one-third of the cake’s overall diameter. If you want a wide mouth opening, insert a small cardboard support round beneath the layer directly above the mouth cut.
Storage, Display, and Transportation Best Practices
Proper environmental control ensures your decorated cake arrives at the party venue in prime condition without melting or shifting.
Refrigeration Timeline
Once decorated, store the cake in the refrigerator for at least three hours to allow the buttercream shell to firm up into a solid protective shield. Remove the cake from the refrigerator one to two hours before serving so the sponge and frosting return to room temperature for the best flavor and texture.
Do not insert real cookies into the mouth cavity before long-term refrigeration. Moisture from the buttercream softens crisp cookies, turning them soggy after several hours; add your cookies 30 minutes before display.
Safe Vehicle Transportation
Never transport a sculpted cake on a vehicle seat, as car seats slope backward and cause the cake to slide. Place the cake inside a sturdy bakery box and set the box on a non-slip silicone mat on the flat vehicle floorboard.
Run your vehicle’s air conditioner on high for ten minutes before loading the cake to bring down the cabin temperature. Drive smoothly, avoiding sharp turns and abrupt stops that could displace the heavy decorative eyes.
Recommended Tools, Color Gels, and Hardware
Having the correct pastry equipment on hand streamlines the decorating workflow and eliminates unnecessary hand strain.
- Piping Tips: Wilton #233 (Multi-opening grass), Ateco #133 (Large grass), Wilton #12 (Round tip for eye sockets).
- Piping Bags: 16-inch heavy-duty disposable bags (avoids hand heat transfer better than thin bags).
- Coloring Gels: AmeriColor Royal Blue, AmeriColor Sky Blue, and Regal Purple / Violet.
- Support Materials: 6-inch and 8-inch greaseproof round cake boards, 4.5-inch bamboo skewers.
- Carving Tools: 8-inch offset spatula, 6-inch serrated utility knife, metal turntable with ball bearings.
Related Baking Guides and Internal Links
Expand your party dessert table with these complementary character baking tutorials and foundational guides:
- The Ultimate Crusting American Buttercream Recipe for Sculpted Cakes
- Step-by-Step Elmo Cake Tutorial: Master Red Fur Piping
- Thick Bakery-Style Chocolate Chip Cookies: The Ultimate Party Recipe
- First Birthday Smash Cakes: Safety Rules, Dyes, and Toddler-Safe Decorating
- How to Safely Transport Tiered Cakes Without Damage
- How to Crumb Coat Layer Cakes for Flawless Final Finishes
Authoritative References and Safety Standards
Review the following industry standards and culinary safety resources for color usage and cake structure:
- FDA Food Safety Guidelines: Certified Color Additives in Food and Confectionery (FDA.gov).
- Wilton Decorating Standards: Official Piping Nozzle Sizing and Gauge Dimensions (Wilton.com).
- Partnership for Food Safety Education: Safe Temperature Handling for Dairy-Based Frostings (FightBAC.org).
Key Takeaways
Creating a realistic Cookie Monster cake comes down to basic physics and deliberate prep work. Mastering these core principles ensures success every time:
- Chilled, firm cake layers prevent crumbling and allow clean, stable mouth carving.
- Adding a micro-touch of violet neutralizes yellow butter tones to yield true cobalt blue.
- A multi-opening grass tip held at 90 degrees produces authentic puppet fur with zero sculpting skill.
- Uncoordinated, off-center pupils are essential for achieving the classic goofy character expression.
- Wedge crisp cookies into the mouth shortly before presentation to prevent sogginess.
Final Thoughts
Baking a themed character cake is an extraordinarily rewarding creative project. While piping individual fur strands takes patience and steady pressure, seeing the character come to life on your turntable makes every minute worthwhile.
Gather your tools, chill your sponge layers thoroughly, and mix your blue frosting the night before. With the right foundation and steady hands, you will deliver an unforgettable celebration centerpiece that delights guests of all ages.
Frequently Asked Questions
Which piping tip makes the most realistic Cookie Monster fur?
The Wilton #233 or Ateco #133 multi-opening grass tip produces the most authentic fur. These specialized nozzles feature tiny perforations that extrude multiple distinct buttercream strands simultaneously. The pull-and-release technique creates the classic shaggy puppet look with minimal effort.
How do I make frosting true royal blue without turning green?
Butter has natural yellow undertones that turn blue dye green. Add a microscopic speck of violet gel color to neutralize yellow tones before blending your Royal Blue and Sky Blue food gels. Let the frosting sit for a few hours, as the color deepens dramatically over time.
Can I use store-bought frosting for piping Cookie Monster fur?
Standard canned frosting is generally too soft to hold the upright structure needed for realistic fur. If using canned frosting, whip in 1/2 cup of sifted powdered sugar and 1 tablespoon of cornstarch per can. This stiffens the emulsion enough to hold distinct peaks when extruded through a grass tip.
How far in advance can I decorate a Cookie Monster cake?
You can fully pipe and assemble the cake up to 24 hours before your party. Keep the decorated cake refrigerated to preserve fur sharpness. Do not add the chocolate chip cookies to the mouth cavity until 30 to 60 minutes before serving, as moisture from the frosting will make them soggy.
What are the safest edible eyes for a baby’s first birthday smash cake?
Avoid using toothpicks or wooden skewers when decorating a smash cake for a one-year-old. Instead, make soft eyes from large marshmallows, white meringues, or firm mounds of white buttercream piped directly onto the cake surface. Use soft black cocoa frosting to pipe the pupils safely.
How many batches of buttercream do I need for an 8-inch cake?
An 8-inch three-layer cake requires approximately 5 to 6 cups of blue buttercream for the fur, plus 2 cups of filling and crumb-coat frosting. Fur piping uses about 30 percent more frosting than a smooth-sided cake, so always prepare an extra half-batch to ensure you do not run out mid-pipe.
Why are my piped fur strands breaking or falling off the cake?
Strands break when the frosting is too dry or when pulling away before releasing pressure. Ensure your crumb coat is tacky so the fur sticks firmly. Touch the tip to the surface, apply pressure to anchor the base, stop squeezing completely, and then pull the bag away smoothly.
What kind of cookies work best in Cookie Monster’s mouth?
Crisp, crunchy chocolate chip cookies work better than soft-baked varieties because they resist softening from buttercream moisture. Standard Chips Ahoy or homemade drop cookies baked slightly crisp hold their shape cleanly when wedged into the mouth cavity and scattered around the cake board base.