Quick Summary: How to Draw a Birthday Cake
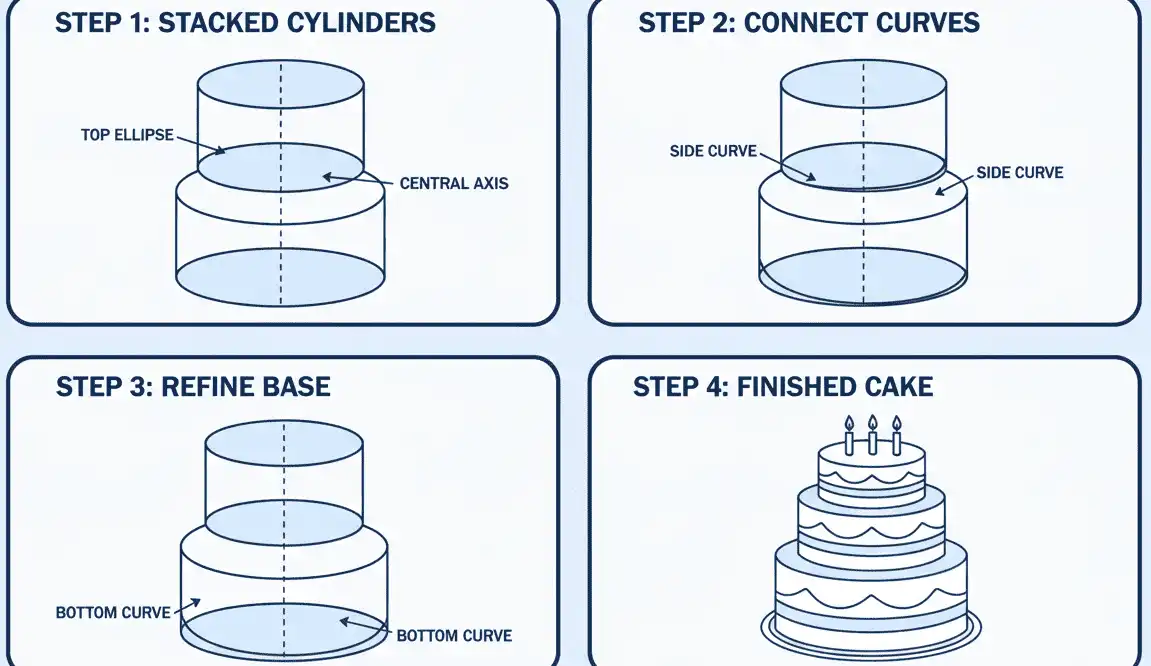
To draw a simple birthday cake, start by sketching a horizontal oval (ellipse) for the top surface of the upper tier. Draw two straight vertical lines downward from the left and right edges, then connect them with a curved line matching the bottom arc of your initial oval.
Repeat this process directly underneath with a wider oval to form a two-tier structure. Add wavy lines along the rims to represent dripping frosting, sketch tall narrow rectangles with teardrop shapes for candles, and finish with a decorative platter at the base.
- Core Geometry: Stacked cylinders made of matching ellipses and parallel vertical edges.
- Key Detail: Always mirror the curve of the top oval at the bottom of each tier to maintain correct perspective.
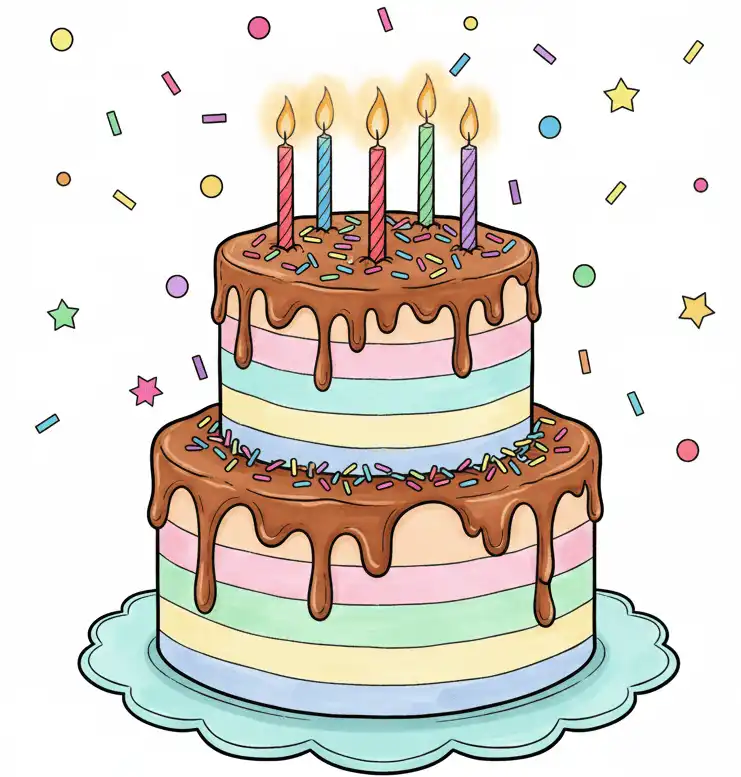
- Finishing Touch: Use bright, saturated base colors with soft shadows along one side to create 3D volume.
Introduction
A birthday cake drawing is one of the most recognizable and joyful subjects an artist can tackle. It represents celebration, warmth, and indulgence, making it a favorite project for handmade greeting cards, classroom art sessions, and sketchbook practice.
This guide is designed for parents teaching creative skills at home, teachers planning structured art lessons, and beginners wanting to move past rigid box shapes. Whether you are drawing with a toddler using washable crayons or practicing digital illustration on an iPad, the underlying principles remain consistent.
You will learn the fundamental geometry behind cylindrical stacking, methods for rendering glossy frosting drips, and coloring techniques that produce realistic depth. By following our systematic breakdown, you can turn a basic line sketch into a vibrant, festive illustration.
Essential Drawing Materials and Workspace Setup
Selecting suitable supplies ensures a smooth drawing process, especially when layering pencil graphite beneath ink or wet media. A few basic tools are sufficient to begin, though specific upgrades can help when you are ready to color.
Pencils and Erasers
A standard 2B graphite pencil is ideal for initial construction lines. It is soft enough to glide across the paper without gouging grooves, yet light enough to erase completely before applying ink.
Pair your pencil with a kneaded eraser or a soft plastic vinyl eraser. Kneaded erasers can be molded into fine points to pick up stray marks around tight spaces, such as between candle wicks, without fraying the paper fibers.
Paper Selection
Standard printer paper works fine for quick, casual sketches. However, if you plan to use alcohol-based markers or watercolors, switch to a heavier stock.
Choose heavyweight cartridge paper (minimum 160 gsm) or smooth bristol board for marker rendering. The dense surface prevents marker ink from bleeding into adjacent fibers, preserving crisp edges on decorative piped frosting.
Inking and Color Media
Waterproof pigment fineliners (such as 0.3mm and 0.5mm nibs) produce clean, archival line work that will not smudge when colored over. For younger children, non-toxic, broad-tip felt markers or triangular wax crayons promote an ergonomic grip.
Understanding Cake Geometry: Circles, Ellipses, and Tiers
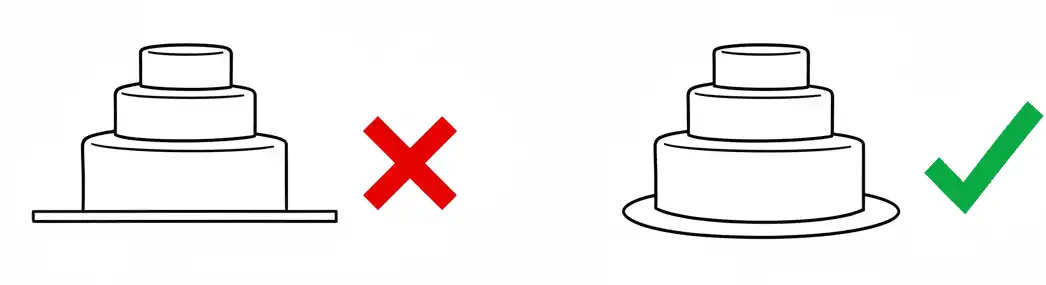
The most frequent hurdle beginners encounter when drawing a cake is perspective distortion. Many beginners draw the base as a flat horizontal line, which conflicts with the rounded top and flattens the illustration.
The Cylinder Foundation
Every round cake tier is a cylinder viewed from slightly above. When a circle is tilted away from the viewer, it appears as an ellipse rather than a circle.
The closer the surface is to your eye level, the flatter the ellipse appears. As you move downward toward the base, the ellipse becomes rounder and fuller to reflect the steeper viewing angle.
Establishing the Minor and Major Axes
Draw a light vertical centerline down the middle of your drawing area. This axis guarantees that both sides of your cake remain symmetrical as you build outward.
Horizontal guidelines running perpendicular to your centerline mark the top and bottom of each tier. Keeping these horizontal marks level prevents your cake tiers from looking crooked or sliding off the plate.
Step-by-Step Tutorial: The Classic Two-Tier Birthday Cake
Follow these structured instructions to build a balanced, two-tiered party cake. Keep your initial pencil strokes light so they erase cleanly once the ink outlines are dry.
Step 1: Sketch the Top Tier Ellipse
What: Draw an elongated, horizontal oval near the upper third of your paper.
Why: This oval establishes the top surface of the upper cake layer and dictates the perspective for the entire piece.
How: Keep your wrist loose and make several light, overlapping oval strokes. Once you achieve a balanced shape, darken the dominant line slightly.
Common Mistake: Pointing the left and right corners like an eye or almond. The ends must curve smoothly like the edge of a racetrack.
Pro Tip: Place your pencil tip at the center and measure out equally to both sides to confirm symmetry before moving forward.
Step 2: Form the Walls of the Top Tier
What: Draw two vertical, parallel lines downward from the widest outer points of the ellipse.
Why: These lines define the height and physical boundaries of your top tier.
How: Drop each line straight down by roughly 2 to 3 inches, depending on your paper scale. Connect their bottom ends with a downward-curving arc that matches the curve of the top oval.
Common Mistake: Drawing a straight, flat horizontal line across the bottom, which ruins the three-dimensional illusion.
Pro Tip: Trace the curvature of the top ellipse with your finger, then lower your hand and mimic that exact curve at the base.
Step 3: Construct the Base Tier
What: Create a larger cylindrical layer directly underneath the top tier.
Why: A wider base grounds the cake visually and provides a stable foundation for the design.
How: From the bottom edge of the top tier, extend horizontal shoulders out to the left and right by about one inch. From those points, drop two vertical lines parallel to the top tier, then close them with another matching downward arc.
Common Mistake: Making the bottom tier narrower than the top tier, which makes the structure appear top-heavy and unstable.
Pro Tip: Make the bottom tier slightly taller than the top tier to create pleasing visual proportions.
Step 4: Sketch Frosting Drips and Layer Borders
What: Add organic, wavy lines along the upper edges of both tiers to depict dripping chocolate or glaze.
Why: Liquid drips break up rigid geometric lines and give the cake an appetizing, handcrafted feel.
How: Draw varying U-shaped loops extending downward from the upper rim. Make some drips long and narrow, and others short and wide, to simulate real-world fluid dynamics.
Common Mistake: Drawing perfectly uniform, identical scallop patterns that look like factory-cut saw teeth.
Pro Tip: Place a tiny, detached teardrop shape below one of the longer drips to suggest a falling droplet of icing.
Step 5: Add Candles and Flames
What: Place birthday candles along the top surface of the upper tier.
Why: Candles turn a generic cake drawing into an unmistakably celebratory birthday centerpiece.
How: Sketch narrow, vertical rectangles emerging from the top ellipse. Top each rectangle with a tiny curved wick line, then encase the wick in a teardrop-shaped flame.
Common Mistake: Placing candle bases below the top tier’s edge, making them look as if they are floating in mid-air.
Pro Tip: Angle the outer candles slightly outward to create dynamic movement, rather than keeping all candles strictly parallel.
Step 6: Draw the Cake Stand or Platter
What: Sketch a decorative plate beneath the bottom tier.
Why: Food drawings look grounded and deliberate when presented on clear serveware.
How: Draw a broad, shallow ellipse that rings the base of the lower tier, extending roughly half an inch beyond its edges. Add a small pedestal stem or beaded trim along the rim for vintage flair.
Common Mistake: Drawing the platter too small, making it appear that the cake is spilling over the edge.
Pro Tip: Add a faint horizontal horizon line behind the cake plate to represent the back edge of a dining table.
Step 7: Detail the Accents and Clean Up Linework
What: Add sprinkles, piped borders, and cherries, then ink the final lines.
Why: Textural details enrich the drawing and give viewers small focal points to explore.
How: Scatter small pill-shaped ovals across the frosting for rainbow sprinkles. Trace your chosen pencil lines using a permanent fineliner, let the ink dry for two minutes, then gently erase all remaining graphite.
Common Mistake: Inking through decorative elements, like drawing a tier line right through the middle of a candle.
Pro Tip: Work from front to back: ink foreground items like candles and front drips first, then ink the background edges around them.
Frosting Styles: Drips, Swirls, and Rosettes
Customizing the exterior frosting is the quickest way to give your birthday cake drawing unique personality. Different icing techniques require distinct stroke patterns and linework.
Piped Buttercream Swirls
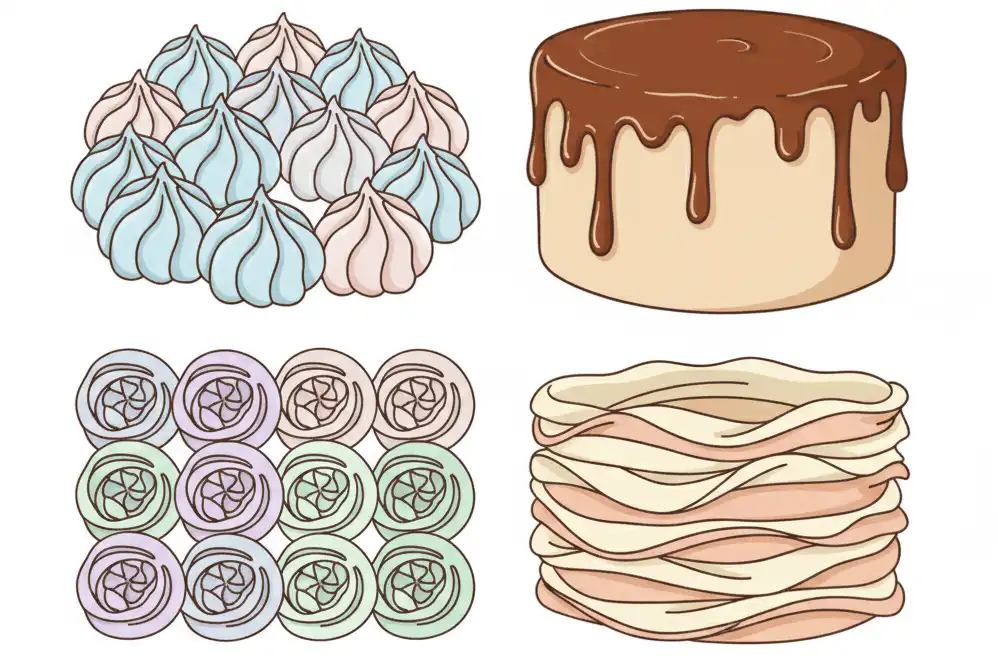
Piped buttercream decorations resemble soft, spiral peaks. Start at the base with a small crescent shape, then curve upward into an overlapping C-shape that tapers to a fine tip.
Cluster these swirls along the rim of the cake to create an indulgent bakery border. Adding tiny vertical ridges inside each swirl mimics the texture produced by a star pastry tip.
Ganache Drips
A ganache drip design features smooth, rounded ends that pool near the bottom of each tier. Keep the top line flush with the cake edge while varying the drip lengths between one-third and two-thirds of the tier height.
Thick drips should taper slightly in the middle before swelling into a round bulb at the tip. This bulb mimics surface tension in real melted chocolate.
Piped Rosettes and Fondant Ruffles
Rosettes are created by drawing nested rose petals starting from a tight central comma and expanding outward into overlapping crescent arcs. They work well for floral party designs.
Fondant ruffles require wavy, ribbon-like parallel lines that follow the cylinder contour around the sides of each tier. Keep these lines delicate so they do not overwhelm the main silhouette.
Creative Variations: Kawaii, Realistic, and Single Slice
Once you understand the basic two-tier foundation, you can adapt your drawing to fit different artistic styles and project themes.
Cute Kawaii Style Birthday Cake
Kawaii illustration relies on exaggerated, friendly proportions and expressive faces. Reduce the cake height so each tier appears squat and chubby, like a rounded disc.
Place two wide, glossy black circle eyes along the front face of the lower tier, positioning them far apart for maximum cuteness. Add a petite U-shaped smile between the eyes and two light pink blush ovals directly beneath them.
Realistic Layered Bakery Style
Realistic cakes emphasize structural accuracy, authentic textures, and nuanced shading. Rather than flat decorative bands, sketch subtle crumb textures along exposed sponge borders.
Incorporate small imperfections, such as slightly asymmetrical icing dabs or natural candle wax runoffs. Use refined cross-hatching to define gentle cast shadows underneath the decorations.
Single Triangular Cake Slice
Drawing an individual slice highlights internal filling layers, fruit compotes, and sponge crumb textures. Begin with a narrow wedge shape viewed in three-quarter isometric perspective.
Draw two parallel walls angling backward from a sharp front point to show the interior filling strata. Sketch three alternating horizontal bands to represent sponge cake, separated by thin, creamy frosting layers.
Coloring, Shading, and Lighting Effects
Color choices and value contrast transform a flat line sketch into a convincing, mouth-watering illustration. Establish a single light source before laying down your first marker or pencil strokes.
Picking a Harmonious Color Palette
Select three primary colors to maintain visual balance throughout the cake. Pastel pinks, soft creams, and light mint greens work well for playful, sweet themes.
For rich, celebratory chocolate cakes, combine warm ochre, burnt umber, and deep mahogany brown. Reserve bright, saturated tones like lemon yellow and cherry red for accents like candles and sprinkles.
Rendering Cylindrical Volume
Assume your light source is positioned above and to the left of the cake. The left side of each cylinder should display the brightest highlights, while the right side falls into soft, graduated shadow.
Blend your base color into a tone two shades darker as you work toward the right edge. Apply a thin strip of core shadow slightly before the far right boundary to leave room for reflected ambient light along the outer rim.
Creating Candle Flame Glow
To simulate glowing candlelight, leave a ring of untouched white paper around each flame wick. Color the flame core pale lemon yellow, shifting outward into bright orange at the tip.
Lightly glaze a soft yellow halo across the frosting directly beneath each candle. This cast glow reinforces the illusion of a vibrant, active light source in your scene.
Adapting the Activity for Different Age Groups
Drawing activities should match the developmental stage and fine motor control of the artist. Adjusting the approach ensures everyone stays engaged without becoming frustrated.
Preschool to Kindergarten (Ages 3–5)
Focus on recognizable primitive shapes rather than strict perspective. Encourage children to draw simple stacked squares or rectangles instead of ellipses.
Provide thick, chunky crayons or washable dot markers. The primary goal is building hand-eye coordination, recognizing primary colors, and enjoying personal creative expression.
Elementary Students (Ages 6–9)
Introduce the curved baseline concept to demonstrate how cylinders differ from flat boxes. Children in this bracket enjoy adding varied toppings, like cherries, candy sticks, and custom candle counts.
Demonstrate how to ink over pencil outlines and erase construction lines safely. This age group responds well to simple color-wheel combinations, like pairing complementary colors for the cake body and plate.
Tweens and Beginners (Ages 10+)
Introduce ellipse minor-axis alignment, light source mapping, and consistent shadow placement. Students can practice smooth marker blending, cross-hatching, and intricate piped lace textures.
Encourage experimentation with digital art programs, layers, and specialty brushes, or working with fine-point technical pens on smooth mixed-media paper.
Comparison of Birthday Cake Drawing Styles
Review the breakdown below to decide which drawing style best matches your time frame, skill level, and available materials.
| Drawing Style | Difficulty Level | Best Age Group | Ideal Medium | Key Characteristic |
|---|---|---|---|---|
| Simple Cartoon | Beginner | Ages 4–7 | Wax Crayons / Broad Markers | Flat shapes, bold outlines, bright flat fills |
| Cute Kawaii | Beginner to Intermediate | Ages 7–12 | Felt Fineliners / Colored Pencils | Chubby proportions, big shiny eyes, pastel palette |
| Bakery Realistic | Intermediate to Advanced | Ages 12+ / Adults | Alcohol Markers / Soft Pastels | Accurate perspective, gradual shading, crumb texture |
| Cut Cake Slice | Intermediate | Ages 9+ | Gouache / Colored Pencils | Three-quarter perspective showing inner cake layers |
Using Cake Drawings for Cards and Party Crafts
A hand-drawn birthday cake makes a thoughtful, personalized centerpiece for party decorations and gifts. You can adapt your finished illustration into several practical family craft projects.
DIY Pop-Up Birthday Cards
Fold a piece of heavy cardstock in half to create your card base. Cut two parallel horizontal slits across the center fold to create an internal tab that pops forward when opened.
Draw, color, and cut out your birthday cake on a separate sheet of paper. Glue your cutout directly to the front face of the paper pop-up tab so it stands upright when the recipient opens the card.
Custom Party Bunting and Garland
Draw an outline of a single-tier cake with a prominent birthday candle. Photocopy or trace the outline onto multiple sheets of pastel cardstock.
Invite children to personalize each individual slice or cake drawing with glitter glue, sequence beads, and markers. Punch two small holes in the top of each design and thread baker’s twine through them to hang as festive party bunting.
Expert Drawing Tips and Advanced Techniques
Applying professional illustration workflows will elevate your cake drawings from basic doodles into polished artwork.
Varying Line Weights for Visual Hierarchy
Use varying pen nib sizes to establish depth and weight. Outline the outer silhouette of each tier with a bold 0.8mm technical pen.
Switch to a thinner 0.2mm or 0.3mm nib for fine interior accents, such as the edge of the candle wick, sprinkles, and icing folds. This variation guides the viewer’s eye to primary focal points first.
Adding Glossy Highlights with White Gel Pens
A white gel pen or opaque white gouache is an effective tool for food illustration. Add crisp white crescents along the upper curve of chocolate drips and shiny cherries.
These stark, bright highlights imply moisture and glossiness, making frosting look sweet, rich, and freshly applied.
Common Mistakes and How to Avoid Them
Even experienced artists can fall into predictable habits when illustrating stacked culinary items. Keep an eye out for these frequent mistakes.
1. Pointed Corners on Ellipses
Why it happens: Drawing an ellipse by joining two arched lines often leaves sharp points at the outer boundaries.
How to fix: Imagine sketching a racetrack where a car must corner smoothly without stopping. Keep the outer curves rounded and wide rather than pinched.
2. Mismatched Curvature Between Tiers
Why it happens: Artists often focus on one tier at a time and accidentally flatten the lower tier’s curve.
How to fix: Cut a small curved template out of scrap cardboard and trace it for every downward edge to ensure the perspective remains uniform across all tiers.
3. Inconsistent Candle Angles
Why it happens: Beginners frequently angle candles to match the curved edge of the oval rather than maintaining vertical alignment.
How to fix: Draw light, vertical pencil guidelines from top to bottom before sketching candle shafts. All candles should stand upright, perpendicular to the tabletop surface.
4. Muddy Marker Blending
Why it happens: Layering contrasting colors over wet paper repeatedly can tear the paper fibers and turn colors dull grey.
How to fix: Let your light base tones dry completely before laying in deeper shadow accents. Use an intermediate transition tone to soften hard blend lines gently.
Best Practices for Clean Line Art
Follow this standard checklist to maintain clean results on every drawing project:
- Keep hands clean: Place a clean sheet of scrap paper under your drawing wrist to prevent body oils from smudging soft graphite or damp ink.
- Verify ink permanence: Test your outline pen on scrap paper with your chosen coloring marker to confirm it will not bleed or feather.
- Turn the paper: Rotate your sketchbook freely to find the most comfortable angle for smooth, natural wrist arcs.
- Build values gradually: Start with light pencil pressure; you can always darken a value, but removing heavy graphite without leaving a ghost line is difficult.
Recommended Tools and Learning Resources
If you wish to expand your drawing toolkit, consider these dependable supplies and learning aids:
- Graphite Pencils: Faber-Castell 9000 or Staedtler Mars Lumograph (grades 2B and 4B).
- Fineliners: Sakura Pigma Micron pens with archival, waterproof pigment ink.
- Erasers: Tombow Mono Zero precision eraser for fine corrections and Prismacolor kneaded erasers.
- Marker Paper: Canson XL Marker Paper or Strathmore 400 Series Bristol Smooth.
- White Detail Pen: Uni-ball Signo Broad UM-153 or Sakura Gelly Roll 10.
Related Drawing Guides
Expand your illustration skills with our companion guides and step-by-step tutorials:
- How to Draw a Cupcake: Simple Swirl Frosting and Wrapper Textures
- Easy Party Hat Drawing: Step-by-Step Guide for Kids
- Mastering Candle Flames: Rendering Glow and Warm Light Effects
- Cylinder Perspective Basics: Turn Flat Ovals into 3D Forms
- Kawaii Food Drawing for Beginners: Faces, Expressions, and Poses
- 10 Creative Handmade Birthday Card Layouts Anyone Can Draw
Key Takeaways
- Master the Ellipse: The realism of a birthday cake drawing hinges on smooth, rounded horizontal ovals rather than pointed almond shapes.
- Match the Curvatures: The bottom edge of every cake tier must duplicate the downward curve of the top oval to preserve coherent perspective.
- Symmetry Starts in the Center: Using a light vertical centerline keeps multi-tier cakes centered and balanced.
- Vary Your Details: Natural-looking frosting drips have irregular, organic lengths with rounded, droplet-like ends.
- Establish Consistent Lighting: Highlight one side of the cylinder and shade the opposite side to make the cake look three-dimensional.
Final Thoughts
Learning how to draw a birthday cake unites foundational geometric drawing concepts with playful, creative customization. Once you master the simple stacked cylinder framework, you can adapt your designs to fit endless themes, colors, and celebratory occasions.
Grab your pencil, sketch out your first light guidelines, and remember to curve your lower tier edges. With a little consistent practice, you will create festive, mouth-watering cake illustrations ready for sketchbooks, handmade cards, and family keepsakes.
Frequently Asked Questions
How do you make a birthday cake drawing look 3D instead of flat?
To make your cake look 3D, draw the bottom edge of every tier with a downward-curving arc that matches the top ellipse, rather than a straight horizontal line. Then, apply shading along the side opposite your chosen light source to create rounded cylindrical volume.
What is the easiest way for a young child to draw a birthday cake?
The easiest method for young children is stacking two or three simple horizontal rectangles, with the widest on the bottom and smallest on top. They can add wavy lines for icing, vertical lines for candles, and colorful dots for sprinkles without worrying about complex perspective.
How many candles should you draw on a birthday cake illustration?
For an aesthetic, balanced composition, draw three to five candles on the top tier. Drawing too many candles can crowd the upper ellipse and make line work messy, while an odd number creates natural visual symmetry with one candle anchored along the center axis.
What colors work best for drawing realistic birthday cake frosting?
Soft pastel tones like pale cream, blush pink, and soft mint green work well for vanilla and buttercream frosting. For chocolate ganache, layer light caramel bases with deep umber and burnt sienna shadows, leaving small white uncolored slivers to represent glossy light reflections.
How do you draw natural-looking frosting drips on a cake?
Draw alternating U-shaped loops extending downward from the top edge with varied lengths and widths. Avoid making identical waves; give some drips rounded bulbs at their lowest tip to mimic real melted icing pulled down by gravity.
Can I use markers over pencil outlines without smearing the lines?
Yes, but you must ink your initial pencil drawing using a waterproof pigment fineliner, wait two minutes for it to dry completely, and erase all remaining pencil graphite. This prevents marker ink from dissolving pencil dust and muddying your vibrant colors.
How do you draw realistic birthday candle flames?
Draw a tiny, delicate vertical line for the black wick, then surround it with a teardrop-shaped flame. Color the inner center pale lemon yellow, blend outward into warm cadmium orange, and leave a soft white highlight along one side of the wick to suggest radiant glow.
What kind of paper is best for coloring a cake drawing with markers?
Heavyweight smooth bristol board (around 250 gsm) or bleedproof marker paper is best. These dense papers stop alcohol and water-based marker ink from feathering beyond your black line art, keeping details like sprinkles and delicate piping sharp.